Showing posts with label alpaca. Show all posts

Friday, November 30, 2018

Ideas Abound

With my new 'Retirement' status a bulk of available time appeared. For a knitter that means more time for KNITTING.
I had planned way ahead, a few yaers before I retired, to make sure I had enough money to support my knitting habit. At least, that was the plan when I started writing a few patterns from my knitting projects.

What I did not know was if my plan actually works. If I could succeed or not, I tried not to think about it or worry about it. All I tried was to create from ideas, I had.

My husband would say the plan is working, since he had to assemble and place in the house several cabinets already that now all contain yarn, and will hold more yarn in the future. I must agree, I don't think I had ever seen that much yarn in one place, other than a yarn store.

I am now making plans about future projects to knit from the yarn in the cabinets.
A yoke sweater,
at least 2 hats,
some child dress or poncho,
a brioche-fade-wrap project,
a long cardigan (duster) with pockets,
an alpaca shawl.                                   Those are just a few.
Alpaca shawl Idea

Yoke sweater - optional short or long sleeve
 My Ideas, just looking at the yarn are endless......

Until I have the ideas sold, the samples knitted, and the projects published so I can share the pattern with you, I will just sit and knit, anywhere.


Today, I am waiting for more yarn and Santa Claus, or Nikolaus, as we call him in Germany.


Wednesday, November 21, 2018

Vitality Wrap Pattern released

A new Digital Pattern Collection from KnitScene is now released on Interweave and Ravelry.
The collection is named Knitscene Accents 2018 and contains 20 knit patterns.
Knitscene Accents 2018 Digital Edition

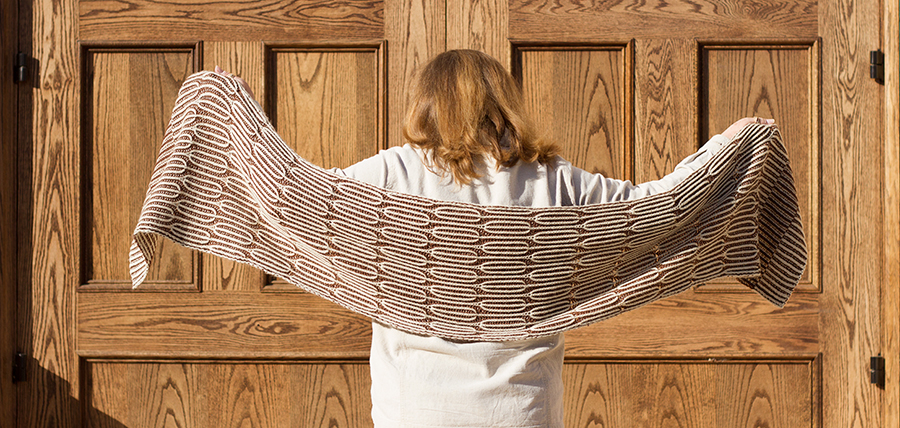
My Vitality Wrap is among those special knits, perfect for any knitter, beginner or experienced.


••This shawl is worked back and forth in rows
from the bottom up.
••When working the brioche rib, two consecutive
right-side rows and two consecutive wrong-side
rows are worked by sliding the stitches from one
end of the circular needle to the other.
•• In brioche stitch, when counting stitches, each
slipped stitch with its companion yarnover
count as one stitch. When counting rows, one
visible row counts as two rows.
•• Do not break yarn at color changes. Carry
unused color up the side of work until it is needed
again. Bring new color under color just used.
•• Slip stitches purlwise with yarn in front.


This project was a joy to knit and wear. The yarn is a squishy soft dream. Try it, you will see what I mean.

My modelling before the shawl was shipped to the Magazine


Saturday, July 28, 2018

Bailiff Scarf Pattern

Alpaca fibers are somewhat new to me.
I always thought of wool being scratchy. I just could not wear it. Throughout my many years of knitting the fibers I worked with where mostly cotton, or some kind of poly-amid/wool mix. A few years ago I have read somewhere that alpaca fibers are without some of the 'hooks' that makes yarn scratchy and felt easily. It made sense to me after I also found out that the absence of these hooks makes items knitted with alpaca tend to stretch over time. No hooks in the fiber = no hold of the fiber = stretch.
For the Bailiff Scarf the design was optimized to keep the shape and reduce the natural tendency to stretch by using the yarn 2 strands held together. This 2-stranded knitting also allows the play with color combinations and produced the fabulous marled look.
If you never have entered the world of fisherman's rib knitting, you should. The new Bailiff Pattern is perfect for the first try, or the fully experienced fisherman's rib knitter.
For approx $32.00 dollars (small version) this scarf can be knitted. For yourself, or for your favorite man (husband, boyfriend, friend, buddy). It is super cuddly because the entire scarf is worked 2-stranded which makes the already cushiony fisherman's rib double soft. Alpaca warmth and then double stranded makes this the go-to scarf for keeping deep winter temperatures at bay.
Bailiff Scarf


Saturday, February 11, 2017

Wygoda Tips and Tricks to marking lace knitting

My new lace design Wygoda just went live on knitpicks and ravelry this month.

For knitters who are a little intimidated about lace knitting, like I was, there are clearly some tricks that can make this lace-intensive cape a truly enjoyable knitting project.

 This rectangular cape is constructed started with an Estonian cost on, and off-set Estonian water lillies.
Front, back, and side view are stunning and impressive.


 The knitpicks yarn Paragon is ideal for this type of accessory. Knitpicks describes the yarn on the website:

Bounce, luster, and luxurious sheen - Paragon is the epitome of fabulous! Our newest sport-weight yarn is fabulously squishy due to fine Merino wool. Combined with Baby Alpaca for amazing drape-ability and Mulberry silk for a gorgeous shine, Paragon is sure to become your favorite yarn for projects.


First is the Estonian cast on. It is ideal because of the elastic properties. I have practiced from watching this you-tube video:  Estionian Cast-on

Instructions:
Step 1: Measure your yarn by wrapping it around your needle 5 times. This will equate to about 5 stitches. You can also measure about 1″ per stitch.
Step 2: Create a “U” with your yarn and place is in your non-dominant hand. Hold both strands together with the bottom three fingers of your hand.
Step 3: Insert your index finger and thumb into the loop you created and spread your fingers apart.
Step 4: Take your knitting needle and place it on top of the bridge of the yarn. Then scoop up the yarn going over the top and twist around. You should now have a loop around your knitting needle.
Step 5: Hold your yarn like a slingshot and using your knitting needle, pick up the outside strand of yarn on your thumb, going under and up through the loop on your thumb.
Step 6: Bring your needle over the top of the inside strand that is around your index finger and pick up that strand.
Step 7: Pull the strand back through the loop on your thumb.
Step 8: Release the loop from your thumb and tighten the stitch down. (one stitch added)
Step 9: With your thumb, pick up the strand that was around your thumb previously, but with the yarn attached to your knitting needle on the outside of your thumb rather than the inside.
Step 10: Pick up the inside strand of yarn on your thumb, going through the loop on your thumb and under the inside strand.
Step 11: Bring your needle over the top of the inside strand that is around your index finger and pick up that strand.
Step 12: Pull the strand back through the loop on your thumb.
Step 13: Release the loop from your thumb and tighten the stitch down. (one stitch added)
Repeat steps 5 – 13 until you have cast on all the stitches required by your pattern.
When you are ready to proceed and begin the lace portion take a moment and mark the chart, or the row by row details with the placement of markers. Between stitch 13/14 and 18/19.

DON'T BE INTIMIDATED!!!!!!!
It took me 2 tries to get it right. For you, if you follow my advice, you can do it already the first time.

The main difference to regular markers setting: THE MARKERS ARE 2 DIFFERENT COLOR YARN STRANDS.
Cut 6 in long contrasting color strands. I have used pink to mark the beginning of a pattern repeat and blue for marking the middle section of each repeat. Between stitch 13/14 and 18/19.  The last yarn marker shows the end of the last pattern repeat.

The reason to use yarn markers instead of round metal or plastic marker is important. The pattern has ssk and k2tog stitches that move to the right and then again to the left, where standard markers would have to be removed and re-set all the time.
With the yarn markers this 'problem' does not happen. 
When you arrive at the stitch where the marker should be set, reach behind the knitting (if you are knitting a right side row, the marker yarn end would be on the wrong side; if you are knitting a wrong side row, the marker yarn end would be on the right side) and pull the marker yarn strand up and over the gap between your stitches.
Regardless if the 13th stitch is a ssk or a k2tog stitch, the marker can easily be placed. You do't have to remove a standard marker first in order to accomplish the knitting 2 stitches together. The yarn is not in the way and can be left where it is. You will always be able to mark with the hanging strand from the back of your knitting.


If this does not make any sense as you read it. Believe me, be adventurous, try it! If it still does not make any sense, please e-mail me at oberpfalzerin@hotmail.com, or contact me on ravelry.com/oberpfalzerin.
I am available and will make sure you will succeed.


Sunday, December 13, 2015

newly found energy

You know sometimes the right emotion is missing and progress in one area is not achieved. This was happening with my brioche project, the See Me Shawl
Even though the shawl was finished back in July, there was never a right time to photograph it. This year San Diego decided to delay the end of the summer into the winter. Only last week it was finally cold.
The scramble began:
1. get the camera man on notice for Sunday
2. keep checking the weather map to make sure it will be cold, but not raining.
3. try different outfits and decide "WHAT TO WEAR" this is so hard!
4. get up early.
5. pick up the camera man (we are trying a new guy).
6. drive to the park where I was hoping for just the right background.
7. practice posing
8. OK, this is it...............


What do think?
The story is not over yet, though. With having pictures, finally, comes another whole set of activities:
1. finish the pattern words, abbreviations, and tech details.
2. select and size the pictures.
3. decide how much to charge for the pattern and the finished shawl ( i am not keeping it, you know San Diego is not cold enough for cashmere).
4. set-up the ravelry site for the new pattern.
5. publish it on ravelry and loveknitting.
6. set-up an add for the shawl on etsy.com.  the shawl for sale on etsy
7. set-up a few adds on ravelry forums for the pattern.

BOOM, BOOM, BOOM

The result is my enjoyment with the actual knitting activity, the process of creating, and now the process of sharing.
Some might think: She is just doing in it for the money.
I would counter: If I can sell enough patterns to by more yarn, to design more knitwear, than I am truly happy.
So, I have only a few more sales to go on this one. An hour after the pattern went live I sold one already. $3.99 chaching....


Sunday, July 12, 2015

My First Brioche Project

Trying to be a knitter that creates current styles with a vintage feel is my goal. To achieve that goal is a constant journey. My never-ending story!
This year I had a definite plan... (wait a minute, my dog Maxy wants a treat, ok, done)
As a knitwear designer Vogue Knitting is a must read. 


Usually the Vogue Knitting Live events are in cold weather states, but this year Vogue Knitting decided to come to Pasadena, CA. Close enough for me to travel there. I did more than that though. I signed-up for some knitting classes. The event was well organized, and not too busy to be lost in the crowd.
 I could see that my designs can stand up to the professionals. I am wearing my newest design "Valace" and it is just as current and relevant.


My main learning objective for that convention was to master the Brioche stitch. I was so excited to have the opportunity to attend a class from THE master brioche knitter, Nancy Marchant. I was prepared and spent a few weeks before the event testing out some one color brioche knitting. Then graduated to some 2-color brioche knitting. Tried some color reversals and also read as many articles as I could find about the brioche stitch in other knitting magazines. Some articles presented comparisons to the Fisherman's stitch. They referred to 1-row, 2-row or even 3-row increases and decreases. 
By the time the convention began I was pretty much confused and sort of disillusioned. 
HOW COULD I HAVE ASSUMED TO LEARN THIS STITCH IN JUST ONE CLASS?

Nancy Marchant, you are my brioche idol. Not only did your one class "Fresh Brioche" teach me enough basics to venture out and design my first shawl. You also made the entire experience fun.
I have searched for a while now and finally found the yarn for my first Brioche design. When all else fails, Rowan usually has what I need. Rowan finest is a mix of extra fine merino, cashmere, and royal alpaca. It is so unbelievably soft, truly a luxurious experience. It also knits well.

Today my shawl knitting project reached the 1/2 way point and I was shooting the first pictures.


Blocking this shawl will hopefully bring out the depth of the geometric pattern on both sides. Since it is fully reversible, the shawl can be worn as light colored or dark colored accessory. The yarns fiber combination will make it a warm choice for cool outdoors, or a dress-up accessory for evening attire. It could even be used wrapping your head in to provide the warm final touch for keeping the ice cold winter wind away.  Now I can't wait to finish it. I will have to find a perfect shawl pin for it. This design deserves a statement-making piece of jewelry, Right?
The name for this pattern is also decided:

See Me


Tuesday, September 30, 2014

San Diego Yarn Crawl 2014

Talk about yarn intertwined with life! here is one of those 'perfect examples'!

Saturday 10:00AM, right after breakfast, we took a ride to Chula Vista. The store was my chosen starting point for the yarn crawl that day. I had never been there before.

They have plenty of parking in the back of the store

The sign in front is big enough, you can't miss it

I was really surprised and impressed with the enormous selection of well-known yarns. Now I know to go to Border Leather and Yarns when I need something unusual and don't want to wait until an on-line purchased package arrives.
We stayed for one raffle drawing, purchased a nice light green ball of wool and went on to the next store on the crawl schedule. The grove at Juniper $ 30th.
I had visited that store many times before. It is located close to my home and 'shop local' is one of my mottos. We found a decorated 'YARNBOMBED' bike stand in front of the store and many people inside. The yarn selection is much smaller there, but I have learned that a local yarn company, Ewe ewe yarn, is carried there.
So if you ever want to get wool for a child project, try http://www.eweewe.com/welcome/

It was still before Lunch - so we went on the next store on my list, Yarn and Thread expressions in
La Mesa.
This is the store I find what I am looking for the most. They have the regular, and the rare yarn. I also like the little poodle that is guarding the cash register. Very sweet little girl.

 
My life is about yarn, intertwined with life. So a visit to my very young friend in Escondido fit right in at lunch time. My little friend Allison is always happy to see me.
 
Parents and Grandparents are all taking a break from packing. Allison's dad is called up to the reserves and I will miss them. At least for a year.
 
Luckily I had the good fortune to spend a little time with the new baby, Adelle.
 
Ruben is a natural
 
La Dolce Vita Alpaca, enjoy the Alpacas. I did!

I even got to touch one, sooooooo soft.

Other's liked it here too.
 
All together that farm has 45 animals. A lot of yarn, I'd say.
 
The guard was on a break, apparently.
This was the day one result. Future socks and hats.

Sunday morning we went to have breakfast on the beach. There is an IHOP very close to the Needlepoint Cottage.
 
Here you will find a large selection of really inexpensive and really expensive yarn. She carries both. She also has a large selection of needle point kits and accessories. This one is always worth a visit when you are just looking for the next project.
 
You never know what you are going to find. I found a book about beading, knitted or crochet beading. Hmm, I wonder if my next project is going to have beads!
 
My new stash.
 
Red Hats, can you see it.
Green hats, just yummy.