Showing posts with label hoodie. Show all posts

Sunday, July 5, 2020

True - New - Same

While nothing is the SAME any longer, I must say it is TRUE that with my knitting live nothing is NEW. I am as busy knitting as I have always been, and then some.
Patterns on ravelry: https://www.ravelry.com/designers/renate-kamm

Besides the commercial side of knitting I do as I always have. I knit for the ones around me, and for myself. With that out of the way, let's just look at the projects that kept me busy knitting. 
Firstly, I made a hoody for Ruben. It's as he always wanted: Mexican Flag colors, no sleeves, cropped length, machine washable yarn.


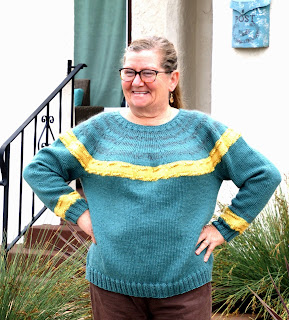
Before that, made my first top-down yoke sweater. This experiment is for myself. The yarn was from a Guild stash sale. I like everything about it. 


There was a pattern that had the rights reverted back to me in March. I did not have the shawl because I gave it away (as I do a lot). I used the opportunity to make Joycejubilair again, and give it an alternate lace edging. 
Knitpicks Original

New version

I am ready for the 2nd half of this wondrous  year. No one know where this is going!


Saturday, February 23, 2013

Cau Cau Surfer Girl

My next adventure is called Cau Cau surfer
The test gauge and knitting pattern trial shows already how the waves will translate right into the finished garment. I can't wait to see the finished work on Miss Allison and show it all to you. So far I have the sketch of the finished dress, the knit stitches I will use and the gauge swatch. This will be a great knitting weekend!!!!


Since it is early and I am still on my first cup of coffee I thought you would enjoy to see my glamour shoots of the last design I have published. The pattern for 'My red Kimono-Hoody' is now for sale at www.ravelry.com and will be added to the www.etsy.com store shortly.

The pictures are from a trip to the "MIDWAY" Aircraft Carrier on Presidents Day last Monday.


shot from the Idol stage were Jessica Sanchez was selected to go on to became the Idol 'runner-up'


Wednesday, December 26, 2012

finishing it

I know finishing work is not only my biggest problem.
Many of my 'knitting' friends tell me the same story: It takes way too long, all the threads to hide, the blocking, the sewing together of all the seams, ....
Well my friends, it is what it is!!!!

With my latest project "little red riding hoody" I shortened the finishing time a little by blocking my work as I finished each piece.


First the back. Then the two front pieces, and then the arms. While the arms dried I closed the shoulder seams and knitted the hood right onto the garment. I did not cast off the middle diamond design stitches on the back piece so I could continue the design into the hood. The button band was knitted on next. I repeated the 8 rows from the jacket and arms edge and added 5 buttonholes in the top half of the hoody. The bottom half remains open.
Once the arms were done blocking I sewed them on. By 'sewing' I mean I crochet them on. I have given-up on using a sewing needle to close any knitting seams. For me the best way is to use a slightly smaller crochet hook and a single crochet stitch to close a seam.
I think you can see in the picture that I did not have the hoodie's side seams closed before sewing on the arms. I also did not have the arm seams closed. I like this method of sewing (crocheting) in the arms open.
It gives me full control over the placement:
-making sure the middle of the arm is placed at the shoulder seam.
-sewing down the back half of the arm and then the front half lets me adjust the arm width to end exactly where I want it to be. It also is much easier to crochet small sections and 'open them again' if it did not quite come out perfectly.


After that I can sit back and take one evening to close the long side and arm seam. All in one. For this little red riding hoody I left a few inches open at the end of the arm's seam and at the other end of the body. That leaves this hoody light any airy. It is not meant to be cuddly warm, rather just a small soft little chill-remover, for evenings near the ocean or cool spring evenings on the porch.

Comparing it to the sketch I made when I first played with the idea of a kimono hoody, this looks a lot like the vision I had. Don't you agree!


I know that the ladies from the Normal Heights knitting group are asking for the pattern. I know, I know. It's time to write it down.
My husband gave me a super Christmas present. It's a Phone and Pad in one, the Galaxy Note II. So guess what! I need to learn how to make the design notes while I am knitting and making the decisions, so I can just push copy - paste and have the pattern already done.
That's the goal for my next project.

But for now I need to get on it. It's time to remember the way I did it, so everyone that wants to make a hoody like this can do it. I am wearing it a few times a week and it goes well with casual and business styles a like.
Oh and Maxy likes me wearing it out on HER walks.

The Pettern is now for sale in German at my ravelry store:
http://www.ravelry.com


Tuesday, November 6, 2012

My 'little red riding hood' jacket

As you might have guessed from the title of today's blog, my jacket is taking shape. The entire body is is done. The front panels the back and also one sleeve.
My current dilemma is that I am not using any written pattern and have to size and try everything before going on to the next step.
These decisions were paramount to a successful Jacket design:
  • - for the first piece, the right front section, deciding the cable design and the length of the Jacket
  • - for the left front deciding that the pattern should be knitted opposite ( the cables are starting in the opposite direction )
  • - for the back deciding the new middle cable design. I have trial knitted swatches to see what will work in concert with the front. I was only sure that I wanted to come up with a bigger diamond design that what is framing the front panels.
  • - for the sleeve there were many little decisions and it took a few days to decide:
    • how wide at the start
    • how wide at the end
    • how long of a sleeve
    • what pattern, if any
 Now that I have both front panels, the back and one sleeve completed I dare not just go ahead and knit the second sleeve. I need to loosely sew the body together and sew on the sleeve to see what it will look like.
I don't have a mannequin!
The sleeve has been done since Saturday and I am avoiding the sewing chore, I wonder why? I feel like I am stuck like a writer with writer's block.
But today, first things first. It is election day in America, after all.
Today really means so much to me, a proud first time Presidential Election voter.
I can not believe it took me 60 Years to arrive at this point in my live, better late than never.

Saturday, October 6, 2012

one down - one more to go

My husband's hoody is finished and I am really proud about how it turned out.


Now it's on to my hoody.
The plan was layed-out months ago, on my visit to Germany.
Step one, buttons:
The PhildarWolle store near my mother's home always has great buttons and I found the perfect 'red' set.   picture of the 6 red buttons

Step two, shoes:
Yes, please don't laugh. The right shoes did come next. I saw them in the window of our new Adams Ave. shoe store and knew they were 'it'. The perfect pair.
Step three, finish the previous project:
I am glad it is done and extremely excited to be able to do the next step.

Step four, yarn shopping:
My husband agreed to go with me. I am not sure if he actually regretted that decision because it took me 4 yarn stores and almost 100 miles until I found the perfect yarn.
Seta Tweed, raspberry color from Lang Yarns. It is made out of 75% silk and 25% cotton. Super light, 100 meters only weigh 25 grams. Half the normal weight. Super soft, as you can imagine.

Step five, designing the look:
What will the finished hoody look like? I did not know but I was certain that I have not found the right pattern and it was up to my creative side to let loose and create it.


As you can see it will be a "kimono - style" hoody. All the edges will be straight. That will enhance the straight cable pattern. The front diamond design will continue on to build the edge of the hood. I think this will work.

Step six, knit a trial section to determine gauge:
I did try different diamond sizes and settled on the smaller, 8 stitches inside. The gauge with needles size 3,75 (German) size 5 US. turned out to be 19 stitches and 30 rows.


Step seven, size the finished garment:
It was time to measure how wide I wanted (needed) the finished hoody to be to fit me. I pulled out my measuring tape and measured hip ( 46 ) and bust ( 46 ) inches. Remembering that the garment will be straight, so it has to fit both wide areas comfortably. 50 inches all the way around will generate a loose fitting jacket. So that was that.

Step eight, calculate the cast on stitches:
Here, as always, I wrote out the pattern number of stitches to be sure the idea in my mind translated correctly. The first section to knit will be the right front. Considering 50 inches all the way around will require one quarter, or 12.5 inches for one front panel. Because I will also add a small button band later I had to make the cast on number for only 12 inches. from the gauge 19 stitches on 4 inches = 4.75 stitches per inch, which calculates to 57 (4.75 times 12) stitches for 12 inches.

Step nine, write out the pattern
from left to right: 1 edge stitch, 2 knit, 5 snake pattern, 3 knit, 5 snake, 3 knit, 5 snake, 3 knit, 5 snake, 3 knit, 5 snake, 2 knit, 14 diamond, 2 knit, 1 edge stitch = 59  Perfect. Lets GO!

Step ten, knit the right front panel


I think it turned out just like I knew it would, it is light and soft and 'very red'.

Step eleven, knit the left front panel
Here I had to let my creative side interject a little. Even though I knew what to do, my inner voice said: "Wait a minute, think this through"! the other side will have to have the designs go the other way. The diamonds are crossing over opposite and the snake pattern is starting by going into the opposite direction as well. So even the starting ribbon section needed to go the opposite way. Thank you Intuition, I could not do it without you!

I promise that this time I will write down the pattern. I have already approached my husband with the task of designing the Yarn-Stube logo for the page I will need to generate a professional looking pattern. Free or for sale on ravelry - I am not so sure yet.

Sunday, September 9, 2012

Finishing the Checkered Past

Yes, I have finally named the hoodie "Checkered Past".
It fits the pattern and the person that will wear it. There are still a lot of finishing tasks left, but the big knitting job is complete.
I had fun using the heel knitting technique to construct the hood.


Select all the stitches around the collar, include the 8 stitches of the button band sections on both right and left sides, knit the hood up in St stitch ( both button band section continue the buyyon band pattern) in brown 10 1/2 to 11 inches.  Then divide the stitches into three sections.
Knit the middle section in green:
At the end of every row knit a green and a brown stitch together until there is only the button band left on both sides.
 
 
So now the next steps:
  • Bind off the green hood top stitches
  • finish the button band and sew it onto the hood (I have 8 stitches for the button band but left an additional stitch to use for sewing the band onto the green hood top)
  • work all the yarn ends into the knitting on the left side (using a crochet hook, as always, is really the easiest method)
  • sew on the buttons
  • make one more photo with the new owner
  • Since the use of this garment is 'in the garage', blocking is not required, ha ha ha
  • find the right 'red summery-type yarn for my hoodie' - I CAN HARDLY WAIT TO GET STARTED
 
In between knitting though I do have to remember that there is another creature in my house hold. Maxy keeps waiting, sometimes really patiently, sometimes not.
Either way, going for a walk with her is never boring. She explodes, just like a little terrier. She wants to be friends with every living thing out and about. What she does though is bark, bark, bark, bark ...... bark, and bark, and scare everything away. Poor Maxy!
 
Today is Sunday though and before I can pick-up my knitting project again I have to go to the local swap meet and 'break' Jaquina, my mother-in-law. This usually is Ruben's pleasure, but he is in Florida, so it falls onto me. I like the swap meet. It's bustling, you never know what you might find, or whom you might meet!


Monday, September 3, 2012

Almost there

All I can think of is putting the pieces together, but it is so warm I am extremely hesitant to pick up my knitting. I have so much time to do it too. It's a three day weekend. I am by myself. What better opportunity, right?

OK, I went on Ravelry yesterday and gave myself a deadline. I told everone else that I will be done with the hoody for my husband by the end of the week. That's all I have been doing and thinking about every time I have a few idle moments. Not really!!!!
I am very good at creating distractions:
- Walking Adams Ave.
- Buying a new pair of shoes
- Thriftstore hopping
- Gardening
- Doing Laundry
- Grocery shopping
- Walking the dog
- Walking the dog
- Walking the dog
- Cooking
- Breakfast, Lunch, Dinner
- where did all the time go?

On top of that, I miss Ruben. Hurry up Rozanna and get better soon!


Monday, August 6, 2012

Man's hoodie progress

While I knit when I can some evenings go by without progress. Working sometimes becomes the draining culprit and sometime life just happens without any time for the HOBBIES.

I have made progress though. The back is done, the right front panel is done, the left front panel is about 1/2 done. Before the left front was started I layed out the right front panel and trial positioned the buttons. I needed to know where and at what row distance to make the button holes.

First I tried to lay-out the buttons to match
the lumberjack pattern but gave up the idea.
I wanted more than just 5 buttons and
10 would have been too many.

Laying the buttons out on the pattern
has always worked for me.
I finally decided the distance of
18 rows works out great for 6 buttons.

So now I am working on the left piece
and include a button hole every 18 rows.


For the 'life just happens' comment I do have pictures for you.
A friend of mine had a baby in April and we, my husband and I, spent Saturday afternoon with 'the Baby' Allison. Isn't she adorable!

Who is this strange woman, MOMMIE help I am being cuddled

Never mind, I am being fed now, let's just let her do it.

Perhaps this stranger is not so bad. I could just smile a little.
She did feed me, after all

This guy has my toy?

Sunday, July 15, 2012

Fair Isle a different way

I am knitting a hoodie for my husband. The idea came from him:
I wish a had a hoddie, something army green, but not too warm, short sleeves would be OK.

The Fall 2010 edition of
Interweave Knits
had a picture and pattern
for a men's jacket
that gave me an idea.

What if I make this hoodie
using a similar design?
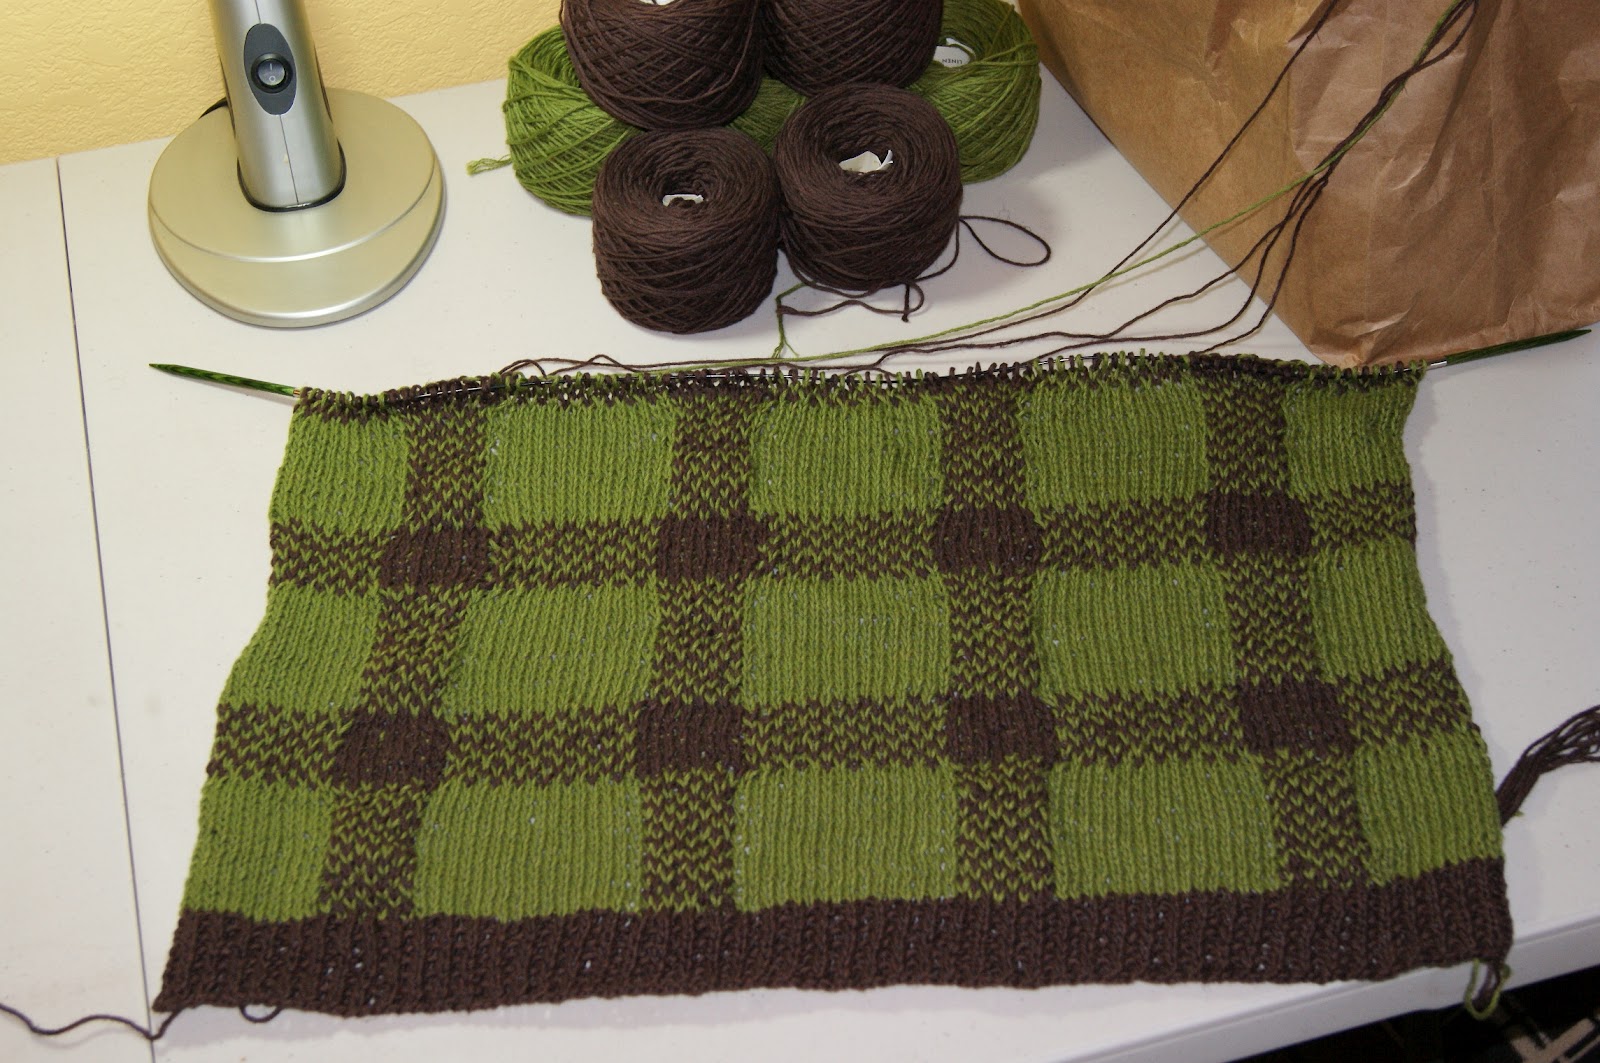
The squares would
be knitted in the Fair Isle
style. I like to knit
designs with colors and
have completed many
Fair Isle knitted garments
and even gloves, shawls,
and socks.
.


"LUMBERJACK" is the name of the squares


For the hoodie I would have to find some summery type yarn. So I did venture to The Black Sheep in Encinitas and came away with Nashua Handknits from Westminster Fibers, 50% Linen/ 50% Cotton.  Like I said, summery yarn, light weight and airy,
The colors are Army Green and Brown. I did look to find a Green/Gray combination, but there was nothing beside merino winter wool available. He said he likes the green/brown combo.
Once I started preparing the work and knitted the Gauge, something dawned on me:
Fair Isle knitting will use double the yarn since the second color is carried in the back all the way from end to the other on every row!

I was shocked when that thought hit me.
There goes the idea of a light and airy hoodie right out the window.
I persisted though and spent a few nights (I do have a day job) figuring out how the gauge that I arrived at would translate. I used 5.5mm needles, larger from the recommended 4.5mm. I wanted a light and airy result, remember.
After gathering my husbands measurements I knew how wide at the hip and breast and how tall from the underarm, shoulders and the middle of the neck the hoodie needed to be.
First, I sketched it out. 26" overall length (he does not like long shirts either), 46" overall width, 2" for a waistband.
Second, I wrote out the design rhythm. Yes, I said that before, rhythm is knitting. 
The Lumberjack pattern in the photo was 6, 12 repeated. For my design that did not work because it would require several more green/brown section then what I had in mind. The design would be too busy and I had to also consider where in the pattern would I have to start to have a good connection to the front.

So I started writing out the rhythm with the front:
button band brown, 7 or 8 stitches, solid green 16, green/brown band 8, solid green 16, green/brown band 8, solid green 4. According to my Gauge that would give me the correct 1/2 of a front.

Ergo, the back would then have to start with the remaining 12 solid green, green/brown band 8, solid green 16, green/brown band 8, solid green 16, green/brown band 8, solid green 16, green/brown band 8, sending with solid green 12.

The left front would then again start with the remaining 4 solid green, green/brown band 8, solid green 16,green/brown band 8, solid green 16, ending with button band brown, 7 or 8 stitches.

I don't know why that always happens, but that is exactly what happened and it resulted in the measurements for my husband's hoodie.


Once I had the pattern and design written down and worked out, I went for it and knitted the waistband.
Row 1: all knit stitches
Row 2: 1 purl, 1 knit, all the way across in that rhythm.

When it became time to start knitting the main body I did remember that my balls were hand wound and I had access to 2 strands from one ball (one from the inside and one form the outside), and a good thing that was.


I still had the problem of double threads on the back to solve.
But, being a long-time knitter I just started thinking. I remembered that most of the Fair Isle designs call for many colors and there was no way to not carry the yarn all the way across. I also remembered that I read somewhere about twisting two strands of yarn around each other once to help carry them across larger sections.
This Lumberjack design was different from regular Fair Isle though. The design just needed two colors in 4 places.
You see, two balls with two ends each, provides brown for 4 places. Just what I needed!


So I decided to use two balls, drawing two strands of yarn out from each ball. I attached each strand at the four places in the pattern that used brown, and not carry the brown all the way across the solid green sections.
I twisted the brown with the green in front of every first brown stitch on every row before knitting the first brown stitch and then un-twist it again after the 8 stitches of the brown/green combo vertical stripe were knitted.
For the horizontal stripe I knitted 8 rows, 1 stitch green/ 1 stitch brown, also using the 4 different brown strands. Every time the knitting would reach the next vertical brown strand, I twisted the current with the next brown and made sure the next brown stitch was knitted with the next brown strand.

This really worked out beautifully!
There are no ends to finish anywhere on the entire back piece except in the beginning row and end row. The balls were 100 grams in size, LUCKY ME.


I have also learned that the best way to make sure the green always gets carried all the way through was to knit (RS) or purl (WS) one stitch on either end of each row using the green main color.


armhole
green is the last stitch all the way around the piece


shoulder
green is the last stitch all the way around the piece


side edge
green is the last stitch all the way around the piece


This was done all throughout the entire hoodie, except the waistband, button band, and hood which are all solid brown.  Actually, the hood is not started yet, and might not be solid brown. You will have to wait and see! So check back if you want to know how this ends.