Showing posts with label fair isle. Show all posts

Monday, December 29, 2014

Rueckblick auf den Herbst 2014

Diesen Herbst war es mir besonders wichtig meiner Kinderverwandtschaft in Deutschland Weihnachtsgeschenke zu machen. Es war nur so eine Idee, am Anfang. Ich Weiss nicht genau warum, aber ich muss ja nicht alles so genau wissen, oder?

 Nun schaut Euch doch mal das Ergebnis an. Sehen die Meadels nicht toll aus mit ihren neuen Muetzen.
 
Folgende Prachtstuecke einzeln vorgestellt:


Tuerkis fuer Charlotte
Gelb fuer Marlene
Dunkelblau fuer Sophie
Blau fuer Marietta
Natuerlich musste ich auch fuer die Trischinger Kinder Muetzen machen. Dass waere ja nicht schoen wenn die Tante aus Amerika nicht alle beschenken wuerde. Undenkbar!
Wenn ich demnaechst Bilder become werden ich die auch hier einfuegen.

Die rote Muetze ist fuer Pia
Diese extra weiche lila Muetze ist fuer Paula
Die gruene Muetze ist fuer Roman.
Und weil er der einzige Bube ist
habe ich diese einzige Muetze gehaekelt. Alle anderen sind gestrickt.
 Jetzt muss ich mich aber wieder mit meinen anderen Sachen beschaeftigen und mich wieder meinen Anleitungen widmen.
Bis zum naechsten mal, Ihr Lieben.
Eure Tante wird sich schon mal wieder etwas einfallen lassen.
Bis dann, ein schones Neues Jahr 2015 wuensche ich Euch allen.


Saturday, January 11, 2014

Aztec Beanie Hat

When my husband Ruben saw a picture of a square beanie he asked me: Can you make one like this with the Alpaca yarn that we bought from the Alpaca farm?
during the San Diego Yarn Crawl we went to visit an Alpaca Farm
The Alpacas are so soft and well behaved
We even were allowed to feed them

Sure, I said. I can even put a little Aztec design in the headband.
I first went on-line searching for the right Aztec symbols, see my entry on November 29, Aztec design

Well, as you can see, the hat is done and at first glance don't look so good

After the miserable picture, I went outside to make another picture and propped the hat on a bowl. Well, that looks much better.

The hat is now blocked and to my surprise, Ruben wears the hat. He has had this morning activity on weekends, where he takes our dog Maxie to the dog park. This warm beanie is perfect for those cold mornings.


Sunday, November 10, 2013

hounds tooth (Hahnentritt) mania

I am not sure where the time has gathered permissions to go by so fast. Looking back at July and August, September, and October I did complete and name some of my visions.
First there was the hounds tooth socks project "don't bite me". Today I am still working on the written pattern.
There was some special learning involved on this pattern, the wandering jog.
After much you tube viewing, I decided to do the wandering jog method. Imagine the way a stripe goes around a Barber Pole, that's how the hounds tooth pattern goes around the leg of the socks.
The cuff, heel and toe were knitted in the solid dark color. The optical vision is supported by knitting all three sections the same length of 30 rows.

The finished socks are a mater piece in my book.


When I first started out I had a design of three different hounds tooth patterns. 4 stitches - four rows; 6 stitches - 6 rows; 8 stitches - 8 rows.
And, because I liked the finished socks so much, I decided to make another hounds tooth project. The black and white Lion Brand special 100% merino yarn that I bought a while back seamed the perfect choice.Ruben could use another sleeveless west.

Decisions I made were simple:
keep the black as first and last stitch no matter what the design beginning and end is.
Make sure that both the front piece and the back piece begin and end with the same pattern, so that, when they are joined, the pattern appears seamless.
The right end begins with the solid black,

 
so the left end ends with the solid white
Since the design was the 6 stitches - 6 rows pattern, I had decided to use a band of 1 purl 2 knit pattern to accommodate the rhythm.
 
The west is now finished and I am hoping Ruben will be ready today to make some great pictures.

As always, San Diego is sunny, warm and irresistible beautiful on this November Sunday.

Sunday, September 9, 2012

Finishing the Checkered Past

Yes, I have finally named the hoodie "Checkered Past".
It fits the pattern and the person that will wear it. There are still a lot of finishing tasks left, but the big knitting job is complete.
I had fun using the heel knitting technique to construct the hood.


Select all the stitches around the collar, include the 8 stitches of the button band sections on both right and left sides, knit the hood up in St stitch ( both button band section continue the buyyon band pattern) in brown 10 1/2 to 11 inches.  Then divide the stitches into three sections.
Knit the middle section in green:
At the end of every row knit a green and a brown stitch together until there is only the button band left on both sides.
 
 
So now the next steps:
  • Bind off the green hood top stitches
  • finish the button band and sew it onto the hood (I have 8 stitches for the button band but left an additional stitch to use for sewing the band onto the green hood top)
  • work all the yarn ends into the knitting on the left side (using a crochet hook, as always, is really the easiest method)
  • sew on the buttons
  • make one more photo with the new owner
  • Since the use of this garment is 'in the garage', blocking is not required, ha ha ha
  • find the right 'red summery-type yarn for my hoodie' - I CAN HARDLY WAIT TO GET STARTED
 
In between knitting though I do have to remember that there is another creature in my house hold. Maxy keeps waiting, sometimes really patiently, sometimes not.
Either way, going for a walk with her is never boring. She explodes, just like a little terrier. She wants to be friends with every living thing out and about. What she does though is bark, bark, bark, bark ...... bark, and bark, and scare everything away. Poor Maxy!
 
Today is Sunday though and before I can pick-up my knitting project again I have to go to the local swap meet and 'break' Jaquina, my mother-in-law. This usually is Ruben's pleasure, but he is in Florida, so it falls onto me. I like the swap meet. It's bustling, you never know what you might find, or whom you might meet!


Monday, August 6, 2012

Man's hoodie progress

While I knit when I can some evenings go by without progress. Working sometimes becomes the draining culprit and sometime life just happens without any time for the HOBBIES.

I have made progress though. The back is done, the right front panel is done, the left front panel is about 1/2 done. Before the left front was started I layed out the right front panel and trial positioned the buttons. I needed to know where and at what row distance to make the button holes.

First I tried to lay-out the buttons to match
the lumberjack pattern but gave up the idea.
I wanted more than just 5 buttons and
10 would have been too many.

Laying the buttons out on the pattern
has always worked for me.
I finally decided the distance of
18 rows works out great for 6 buttons.

So now I am working on the left piece
and include a button hole every 18 rows.


For the 'life just happens' comment I do have pictures for you.
A friend of mine had a baby in April and we, my husband and I, spent Saturday afternoon with 'the Baby' Allison. Isn't she adorable!

Who is this strange woman, MOMMIE help I am being cuddled

Never mind, I am being fed now, let's just let her do it.

Perhaps this stranger is not so bad. I could just smile a little.
She did feed me, after all

This guy has my toy?

Sunday, July 15, 2012

Fair Isle a different way

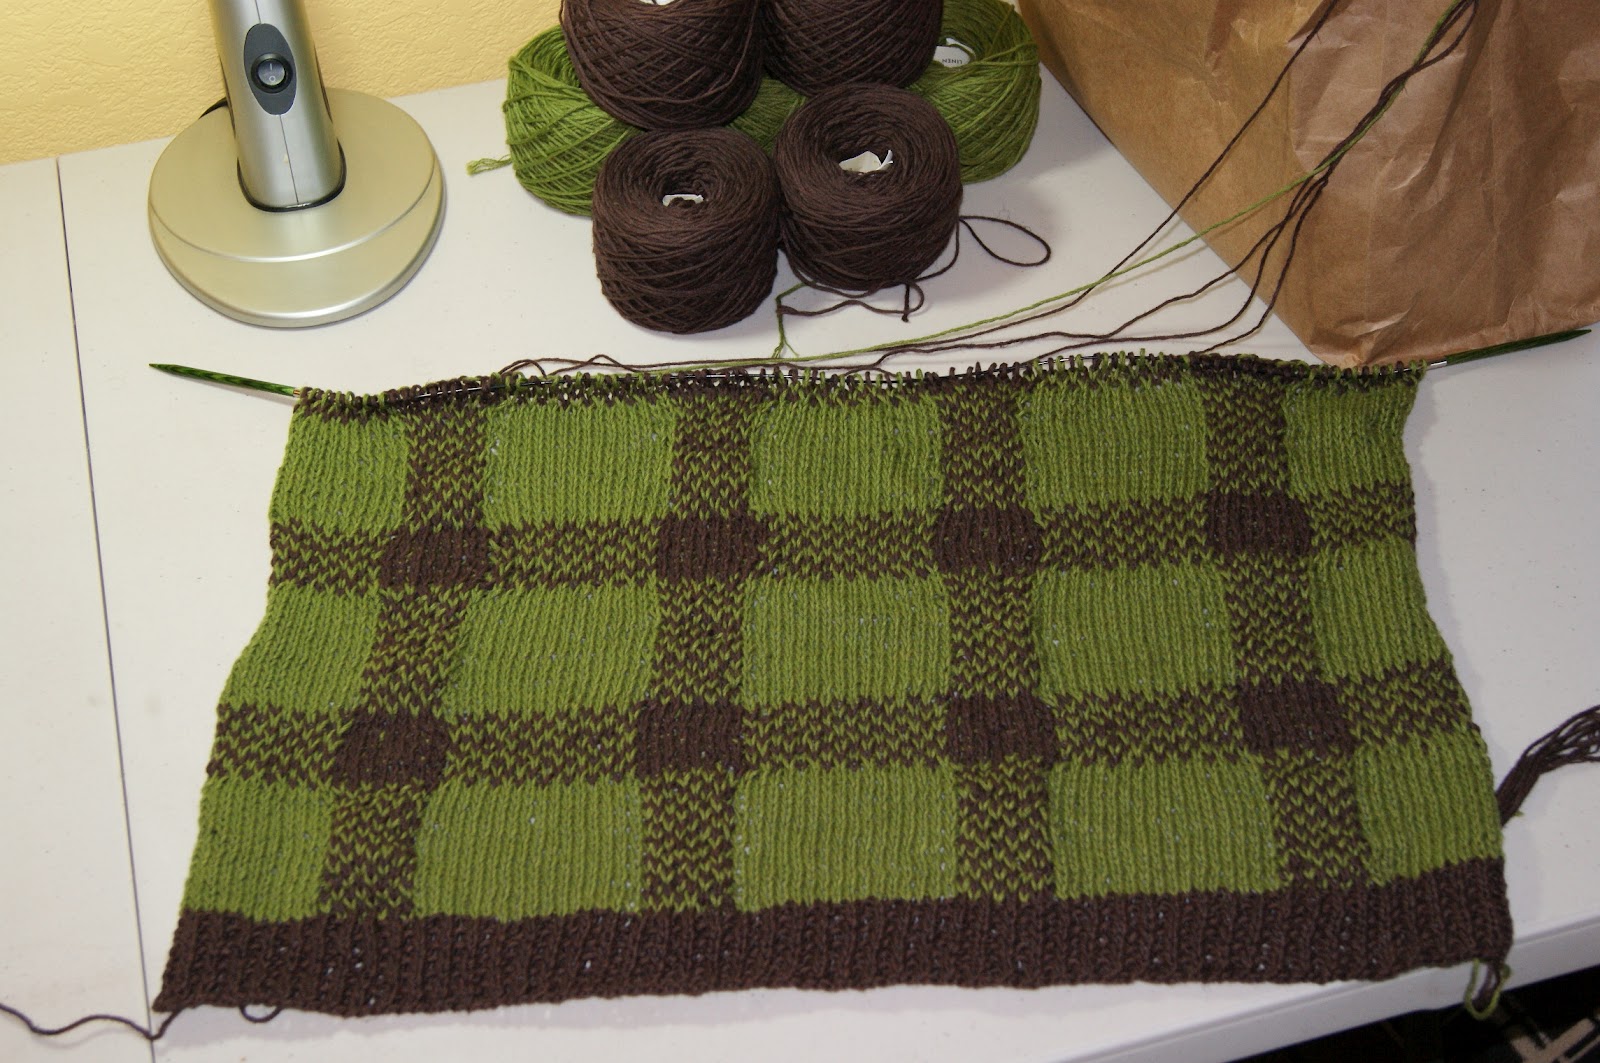
I am knitting a hoodie for my husband. The idea came from him:
I wish a had a hoddie, something army green, but not too warm, short sleeves would be OK.

The Fall 2010 edition of
Interweave Knits
had a picture and pattern
for a men's jacket
that gave me an idea.

What if I make this hoodie
using a similar design?
The squares would
be knitted in the Fair Isle
style. I like to knit
designs with colors and
have completed many
Fair Isle knitted garments
and even gloves, shawls,
and socks.
.


"LUMBERJACK" is the name of the squares


For the hoodie I would have to find some summery type yarn. So I did venture to The Black Sheep in Encinitas and came away with Nashua Handknits from Westminster Fibers, 50% Linen/ 50% Cotton.  Like I said, summery yarn, light weight and airy,
The colors are Army Green and Brown. I did look to find a Green/Gray combination, but there was nothing beside merino winter wool available. He said he likes the green/brown combo.
Once I started preparing the work and knitted the Gauge, something dawned on me:
Fair Isle knitting will use double the yarn since the second color is carried in the back all the way from end to the other on every row!

I was shocked when that thought hit me.
There goes the idea of a light and airy hoodie right out the window.
I persisted though and spent a few nights (I do have a day job) figuring out how the gauge that I arrived at would translate. I used 5.5mm needles, larger from the recommended 4.5mm. I wanted a light and airy result, remember.
After gathering my husbands measurements I knew how wide at the hip and breast and how tall from the underarm, shoulders and the middle of the neck the hoodie needed to be.
First, I sketched it out. 26" overall length (he does not like long shirts either), 46" overall width, 2" for a waistband.
Second, I wrote out the design rhythm. Yes, I said that before, rhythm is knitting. 
The Lumberjack pattern in the photo was 6, 12 repeated. For my design that did not work because it would require several more green/brown section then what I had in mind. The design would be too busy and I had to also consider where in the pattern would I have to start to have a good connection to the front.

So I started writing out the rhythm with the front:
button band brown, 7 or 8 stitches, solid green 16, green/brown band 8, solid green 16, green/brown band 8, solid green 4. According to my Gauge that would give me the correct 1/2 of a front.

Ergo, the back would then have to start with the remaining 12 solid green, green/brown band 8, solid green 16, green/brown band 8, solid green 16, green/brown band 8, solid green 16, green/brown band 8, sending with solid green 12.

The left front would then again start with the remaining 4 solid green, green/brown band 8, solid green 16,green/brown band 8, solid green 16, ending with button band brown, 7 or 8 stitches.

I don't know why that always happens, but that is exactly what happened and it resulted in the measurements for my husband's hoodie.


Once I had the pattern and design written down and worked out, I went for it and knitted the waistband.
Row 1: all knit stitches
Row 2: 1 purl, 1 knit, all the way across in that rhythm.

When it became time to start knitting the main body I did remember that my balls were hand wound and I had access to 2 strands from one ball (one from the inside and one form the outside), and a good thing that was.


I still had the problem of double threads on the back to solve.
But, being a long-time knitter I just started thinking. I remembered that most of the Fair Isle designs call for many colors and there was no way to not carry the yarn all the way across. I also remembered that I read somewhere about twisting two strands of yarn around each other once to help carry them across larger sections.
This Lumberjack design was different from regular Fair Isle though. The design just needed two colors in 4 places.
You see, two balls with two ends each, provides brown for 4 places. Just what I needed!


So I decided to use two balls, drawing two strands of yarn out from each ball. I attached each strand at the four places in the pattern that used brown, and not carry the brown all the way across the solid green sections.
I twisted the brown with the green in front of every first brown stitch on every row before knitting the first brown stitch and then un-twist it again after the 8 stitches of the brown/green combo vertical stripe were knitted.
For the horizontal stripe I knitted 8 rows, 1 stitch green/ 1 stitch brown, also using the 4 different brown strands. Every time the knitting would reach the next vertical brown strand, I twisted the current with the next brown and made sure the next brown stitch was knitted with the next brown strand.

This really worked out beautifully!
There are no ends to finish anywhere on the entire back piece except in the beginning row and end row. The balls were 100 grams in size, LUCKY ME.


I have also learned that the best way to make sure the green always gets carried all the way through was to knit (RS) or purl (WS) one stitch on either end of each row using the green main color.


armhole
green is the last stitch all the way around the piece


shoulder
green is the last stitch all the way around the piece


side edge
green is the last stitch all the way around the piece


This was done all throughout the entire hoodie, except the waistband, button band, and hood which are all solid brown.  Actually, the hood is not started yet, and might not be solid brown. You will have to wait and see! So check back if you want to know how this ends.