Sunday, July 15, 2012

Fair Isle a different way

I am knitting a hoodie for my husband. The idea came from him:
I wish a had a hoddie, something army green, but not too warm, short sleeves would be OK.

The Fall 2010 edition of
Interweave Knits
had a picture and pattern
for a men's jacket
that gave me an idea.

What if I make this hoodie
using a similar design?
The squares would
be knitted in the Fair Isle
style. I like to knit
designs with colors and
have completed many
Fair Isle knitted garments
and even gloves, shawls,
and socks.
.


"LUMBERJACK" is the name of the squares


For the hoodie I would have to find some summery type yarn. So I did venture to The Black Sheep in Encinitas and came away with Nashua Handknits from Westminster Fibers, 50% Linen/ 50% Cotton.  Like I said, summery yarn, light weight and airy,
The colors are Army Green and Brown. I did look to find a Green/Gray combination, but there was nothing beside merino winter wool available. He said he likes the green/brown combo.
Once I started preparing the work and knitted the Gauge, something dawned on me:
Fair Isle knitting will use double the yarn since the second color is carried in the back all the way from end to the other on every row!

I was shocked when that thought hit me.
There goes the idea of a light and airy hoodie right out the window.
I persisted though and spent a few nights (I do have a day job) figuring out how the gauge that I arrived at would translate. I used 5.5mm needles, larger from the recommended 4.5mm. I wanted a light and airy result, remember.
After gathering my husbands measurements I knew how wide at the hip and breast and how tall from the underarm, shoulders and the middle of the neck the hoodie needed to be.
First, I sketched it out. 26" overall length (he does not like long shirts either), 46" overall width, 2" for a waistband.
Second, I wrote out the design rhythm. Yes, I said that before, rhythm is knitting. 
The Lumberjack pattern in the photo was 6, 12 repeated. For my design that did not work because it would require several more green/brown section then what I had in mind. The design would be too busy and I had to also consider where in the pattern would I have to start to have a good connection to the front.

So I started writing out the rhythm with the front:
button band brown, 7 or 8 stitches, solid green 16, green/brown band 8, solid green 16, green/brown band 8, solid green 4. According to my Gauge that would give me the correct 1/2 of a front.

Ergo, the back would then have to start with the remaining 12 solid green, green/brown band 8, solid green 16, green/brown band 8, solid green 16, green/brown band 8, solid green 16, green/brown band 8, sending with solid green 12.

The left front would then again start with the remaining 4 solid green, green/brown band 8, solid green 16,green/brown band 8, solid green 16, ending with button band brown, 7 or 8 stitches.

I don't know why that always happens, but that is exactly what happened and it resulted in the measurements for my husband's hoodie.
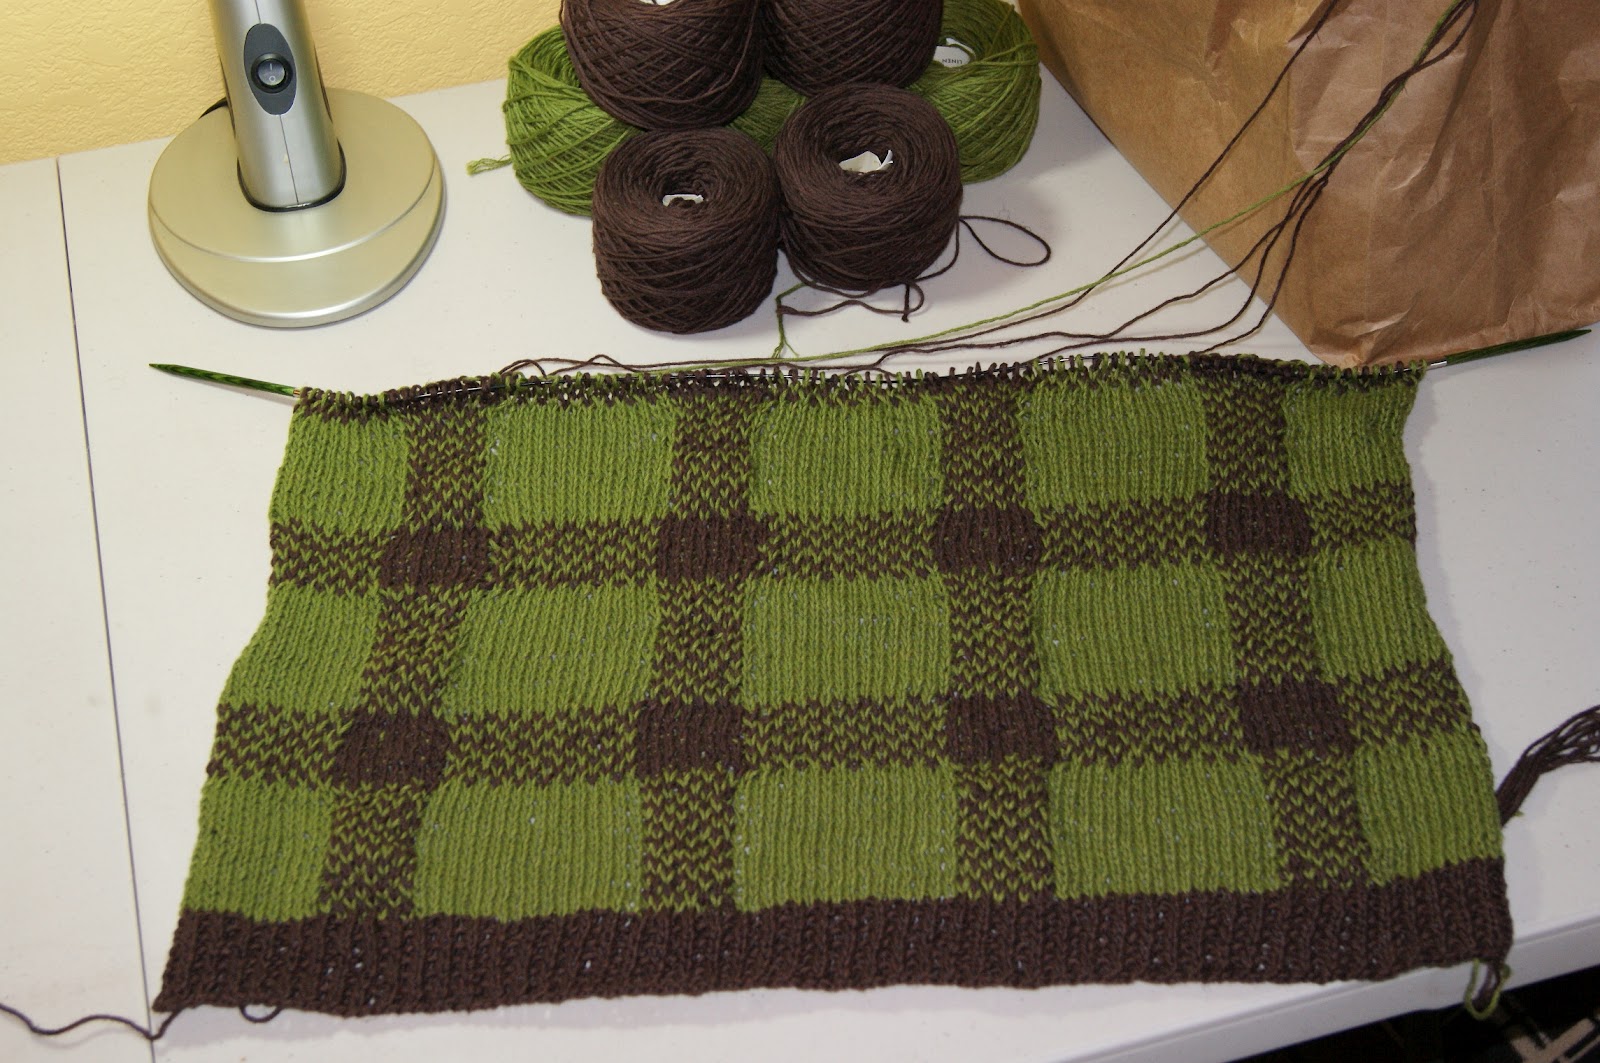


Once I had the pattern and design written down and worked out, I went for it and knitted the waistband.
Row 1: all knit stitches
Row 2: 1 purl, 1 knit, all the way across in that rhythm.

When it became time to start knitting the main body I did remember that my balls were hand wound and I had access to 2 strands from one ball (one from the inside and one form the outside), and a good thing that was.


I still had the problem of double threads on the back to solve.
But, being a long-time knitter I just started thinking. I remembered that most of the Fair Isle designs call for many colors and there was no way to not carry the yarn all the way across. I also remembered that I read somewhere about twisting two strands of yarn around each other once to help carry them across larger sections.
This Lumberjack design was different from regular Fair Isle though. The design just needed two colors in 4 places.
You see, two balls with two ends each, provides brown for 4 places. Just what I needed!


So I decided to use two balls, drawing two strands of yarn out from each ball. I attached each strand at the four places in the pattern that used brown, and not carry the brown all the way across the solid green sections.
I twisted the brown with the green in front of every first brown stitch on every row before knitting the first brown stitch and then un-twist it again after the 8 stitches of the brown/green combo vertical stripe were knitted.
For the horizontal stripe I knitted 8 rows, 1 stitch green/ 1 stitch brown, also using the 4 different brown strands. Every time the knitting would reach the next vertical brown strand, I twisted the current with the next brown and made sure the next brown stitch was knitted with the next brown strand.

This really worked out beautifully!
There are no ends to finish anywhere on the entire back piece except in the beginning row and end row. The balls were 100 grams in size, LUCKY ME.


I have also learned that the best way to make sure the green always gets carried all the way through was to knit (RS) or purl (WS) one stitch on either end of each row using the green main color.


armhole
green is the last stitch all the way around the piece


shoulder
green is the last stitch all the way around the piece


side edge
green is the last stitch all the way around the piece


This was done all throughout the entire hoodie, except the waistband, button band, and hood which are all solid brown.  Actually, the hood is not started yet, and might not be solid brown. You will have to wait and see! So check back if you want to know how this ends.


Thursday, July 5, 2012

multiple colors

I don't know exactly why I do it, but when I am in the middle of a project knitting with more than one color I always ask myself "why in the world do you do this to yourself".
It slows my knitting way down because the pattern needs calculating every step of the way and the strands get tangled up all the time.
I am currently knitting a hoodie for my husband Ruben. It is made out of 2 colors and after spending already 2 weeks into this project, calculating and untangling it finally looks like it's all worth it.


Yesterday I even pointed out to him that the main back panel is the biggest piece. Once that is done everything else is knitting up faster. Naturally, the tangling and calculating gets less and less as well because with the big piece completed you can easily count out the stitches and rows needed to make the front panel or the arm.
This one will have short arms. The hoddie is made out of a cool yarn, NASHUA creative focus linen, 50% linen/ 50% cotton, for those cool summer evening (or days) in San Diego. I am also using much bigger needles than suggested to get a loose knitted garment. The plan is to add a solid brown hood. We will see once the entire body is knitted perhaps I change my mind about that.

Sunday, June 24, 2012

Traveling as a knitter

As most avid 'knitters' would agree, YOU CAN NEVER HAVE TOO MUCH OF A STASH!
That is why I pursue 'finding' the most intriguing yarns on my trips.
Usually on my trips to Germany I buy Regina sock yarns at my German local Phildar store. It's just a few doors away from my mother's apartment. It includes a little coffee shop where we always sit and chat. I just love their buttons. I can never resist some sock yarn, knitting needles and buttons.


This time around I gathered a few more specialty yarns visiting other stores in Europe

In Muenchen I stopped at Lanaiolo  http://lanaiolo.de/ and purchased 2 strands of extreme bright multi-colored lace-weight yarn. I can already see the future scarfs, or cowls, or shawls.


- In Paris I stopped at a sore named La Droguerie http://www.ladroguerie.com/ and purchase 400g (they sell their yarn in weight) Kaleido.


It's 95% bamboo and 5% linen. So soft and smooth, I know the item that will be made out of this will be truly luxurious. I also bought some beads in that store. They will be used on one of the shawls made from the yarn I bought in Muenchen.


All in all the stash for this winter looks promising. Not only because of the trip, but also because before I left on vacation I visited a local Japanese church that had a yarn sale and 'found' irresistible cotton for several baby projects I am planning on completing for little miss Allison Clair Even.


Saturday, May 26, 2012

pot holder surprise

After seeing my pot holder picture at it's new desination home I was eagerly awaiting my pot holder surprise. This week it finally arrived and it truly was a  s u r p r i s e.


Besides the very chockolat looking cup cake pot holder,
the package included 50 cup cake baking cups, German pudding powder,
and a Texas state cookie cutter 


After taking the 'required' photo, I went on-line and posted it on http://www.ravelry.com/ to propperly thank the wichtel partner for her gifts.
All that was left to do was to find a place in my kitchen.


Right there between Micowave and Stove,
the perfect place for it. I am sure this new tool will be used often.

Tuesday, May 22, 2012

giving and receiving things made of yarn

The other day I received an e-mail from a Ravelry.com 'group'. The 'German knitters living in America' group decided to organize a pot holder gift exchange (German word is 'Wichteln'). I was asked if I want to participate, and I could not resist. The rules were really simple, create a pot holder, add some little gift from your kitchen and mail it to someone else that is participating in the exchange. The organizer will send you the address that you need to send your package to.
Great!
I loved making the pot holder and I sure love the pictures that are published every time a 'Wichtel' member receives a surprise package. Everyone that made a pot holder will receive one, but don't know from whom, what it will look like, or what the additional surprise gift will be. I was so eager and it did not take any time at all to crochet my potholder. I made it double thick so it can actually be used without burning your hand. 

the front side is a simple flower in a frame

the backside is solid yellow cotton


The gift item from my kitchen turned out to be two little tea lights and an unopened package of bamboo skewers. Since my package was going to Texas, BBQ skewers seemed the perfect gift.


this is how the package arrived at my 'Wichtel' partner
 Wiebke assured me the skewers will be heavy with meat on a grill this weekend. BIG SMILES for ME.
I like giving away things I make.
It's one of the biggest joys in life, I think..........

Now I am eagerly awaiting my pot holder. I don't know what it will be like, when it will arrive, or what will be in the package with it. Anticipation, another joy in life, right.......

Saturday, May 12, 2012

Finishing Your Work

My mother has found the easiest way to finish her knitting projects. She has a Phildar-Wolle store around the corner, just a few yards away from her front door. So naturally she brings her work to the store and let's the experts finish her work.
For most of us that is not possible and we must finish our own knitting projects. Over the years I have found one easy way: I use a crochet hook
Select a hook that is just one size smaller than the knitting needles and gather-up 8-10 (less with fine yarn, more with bulky yarn) approaching the spot in the knitting were the yarn ends. Then you simply hook the yarn onto the crochet hook and feed it through the gathered stitches.
I also use the same hook to close up the seams, and attach the arms. Using a single crochet stitch I just crochet all the seams together. To make sure the seams do not get too tight or too loose, I first pin the seams together with safety pins or knitting markers. Then check I the work every two inches by laying it flat on a table. You will be able to see right away if you should add a crochet stitch every inch (when the seam too tight and the work does not lay flat) or if you should use a smaller hook and decrease the stitches (when the seam is wavy and wrinkled and the work does not lay flat).
You might think but that means: 'I have to open the seam again'. And luckily you can using the crochet method. If you have used the finishing method of sewing your seam together with a tapestry needle you will be trying to undo stitches that are barely noticeable and that is truly hard and really time consuming.
I think the Crochet method is the easiest and have been using it for many years. Try it!


After all seams are joined it is time to decide what the collar should be like and if it is a sweater with buttons or zipper closure, the front has to be knitted.
With my Baby dress project I decided not to follow the pattern of knitting a ribbed right and left band and then sew that on.
Since the dress had this waistband design I decided to mirror that waistband as the button band.
I gathered up 'enough stitches and then added the right amount of stitches when knitting the first row to have the perfect size band'. How to do that is not hard at all.
From the trial 4" x 4" (or 10cm x 10cm) piece, I know that it takes 22 stitches to over 4" (or 10cm). The overall length of the Baby dress is 24cm.
So the final stitch number has to be 22 x 2.4 = 53
In the case of the Baby dress, the knitting had 43 rows. I was able to gather up 44 stitches from the garment and added 9 stitches evenly during the first row knitting. (every 5 stitches I added one)
Next I had to consider the button holes on the right band. I needed 5 evenly spread out. I started by simply laying the buttons on the dress where I thought they should be. I measured the distance from the middle of one button to the middle of the next button and found that it all works out this way during row 4 of the pattern:
knitting from the bottom up six stitches, cast off three (for the first button hole) knit 8, cast off three (button hole 2) knit 8, cast off three (button hole 3), knit 8, cast off three (button hole 4), knit 8, cast off three (button hole 5) ending with three stitches.
Sometimes the calculator is not the right tool. So don't worry and just lay it out on a table until it looks the way you want it to look then just count out the stitches and GO FOR IT.
As you can see, it turned out great.


If you are not successful, e-mail me.
I can guide you through it.

Sunday, April 29, 2012

Pattern, Size and Yarn before you start a project

Now that my Lace Scarf is done Life happened and put the next project right in front of me. I did not even have to wait a day.


A new Girl was born on April 12. and there is only one thing I could think of:
Knitting a dress for miss PERFECT.
After looking just a few days on-line I found the pattern I wanted to use.
LEA by drops
http://www.garnstudio.com/lang/en/pattern.php?id=5414&lang=en

I have decided to use a 100% silk yarn, Mulberry by Luisa Harding

It feels cool on the skin and it's texture is very luxurious.
My idea was to make this pink dress out of multiple colors. And I must say it really worked out.
The ruffled edge starts with a row of very dark red (color number 028), then the lavender ruffles (color number 06). The pink main body (color number 04) leads into a pink and beige (color number 02) waistline. The upper part has a seed stitch pattern und after the next pink and beige breakline the upper portion of the dress is solid beige, continuing the seed stitch pattern.
It is really fun to knitt this.


Here, I need to share what I have learned over time:
You can use any similar yarn you like,
you are not bound by the pattern to use the exact yarn as the pattern calls for.

To do that is actually simple.
Knit a test 10 x 10 cm ( 4" by 4") piece, or a little larger, as I do most of the time.

For example: the dress pattern called for a yarn that leads to
24 sts x 32 rows in stockinette st = 10 x 10 cm ( 4" by 4")
The yarn I chose to use provided a test pattern
22 sts x 30 rows in stockinette st = 10 x 10 cm ( 4" by 4")

This is very close, don't you agree?
the difference in stitches (2) = less then 10% of 24 (2.4) but more than 5% (1.2)
the difference in rows (2) also = less then 10% of 32 (3.2) but more 5% (1.6)

What I looked at next was the given pattern per size:
What is the stitch difference per size?
Cast on recommendation for size 1 to 3 months and size 6 to 9 months is 366 and 394
the difference in stitches (28) = less then 10% of 366 (36.6) but mor then 5% (18.3)

VOALA, hier is was my answer:
Use the instructions for the 1 to 3 months and  I will end up with a dress that is somewhere between 5 % to 10% bigger than what the pattern describes.
That would make this dress fit a 3 to 6 months old girl, which is just fine with me.

I do measure while I am knitting to confirm that I am not knitting to loose or to tight and still have time to adjust the garment if the calculation was misleading.
So far though, 50 years into doing this, this appraximating of the sizing has never been wrong.

If you are reading this and struggling with sizing your trial knit with the pattern, e-mail me at oberpfalzerin@gmail.com I will help.

I am already looking forward to tonight knitting the arms. Finishing will happen during the week.

Most likely I will also make a little beanie to go with it. I thought it should be like the dress, but the color combination in reverse.

I can't wait to see little miss Allison next Sunday, if all goes well!